When Mosaic was introduced, its power level reached a point where playing with it often feels like cheating. It became so overwhelmingly strong that there’s almost no reason to build anything else if your goal is pure efficiency. Mosaic doesn’t just overshadow every Assassin build, but nearly every build in the entire game. However, if we step away from the Mosaic route, Diablo 2 still offers a wide variety of interesting builds. Mosaic shouldn’t erase everything the game has offered us over the years. This Assassin build takes a different direction, centered around Dragon Tail, a melee skill with a unique built-in Area of Effect. Very few melee abilities in the game provide true splash damage, which gives Dragon Tail a distinct identity and playstyle that feels both dynamic and refreshing. The version presented here embraces a highly aggressive, damage-oriented approach, pushing the skill to its limits. With the right setup, this Dragon Tail Assassin can comfortably handle even fire-immune enemies on Players 8, showcasing just how powerful and enjoyable a non-Mosaic build can be.
Bellona embodies controlled aggression the very spirit of this Dragon Tail Assassin.
Just like the Roman goddess herself, this character thrives in the heart of the fight. Every kick is a battlefield strike, every explosion of Dragon Tail mirrors Bellona’s unstoppable force, and every curse-enhanced hit unleashes a wave of destruction that turns entire packs into ash.
Positive
+ Massive Physical Damage
+ Massive Fire AOE Damage
+ Fast Move Speed
+ Crowd Control
+ Unique Build
Negative
- Tiger Strike Attack Rating
- Some Fire P8 Immunes
- Mediocre Defensively
Dragon Tail Mechanics
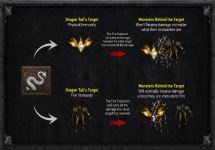
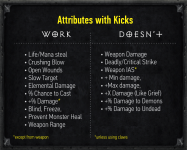
Before jumping into the build it's important to understand how the Skill works and what peculiarities are there about Kicks. Dragon Tail’s tooltip says it deals Fire Damage, which can be a bit misleading because in reality, it deals two types of damage: Physical Damage to the target you directly kick and Fire Damage to the enemies behind that target. Dragon Tail converts your physical damage into fire. The higher your physical damage the more fire damage Dragon Tail will deal. Therefore increasing your physical damage will tremendously benefit Dragon's Tails Fire damage. The confusion starts on how this damage is actually delivered. Even though the fire damage is based on your physical damage, it also depends on the physical damage the primary target receives. This leads to two important interactions:
Stats
When it comes to stats as usual assign enough points in Strength and Dexterity for the gear and the rest to vitality. Remember to account for the stats provided by your Torch and Anni before spending points. Also, equip your gear first to take advantage of any additional Strength or Dexterity bonuses it provides. Doing this will save you a good amount of stat points that can go straight to Vitality. Just a side note, for this build I would also like to mention the option of investing more points into Strength than usual. Since boots are your only source of flat damage for kicks, additional Strength can significantly increase that base damage. A few extra points here can translate into a noticeable boost to your overall Dragon Tail performance. This isn’t a route this guide is focused on, but it’s worth keeping in mind as a viable alternative depending on your gear and play-style.
The core gameplay of this build revolves around spamming Dragon Tail, which thanks to the high physical damage provided by your gear will often be enough to one-shot regular enemies. In higher player settings, where monsters have significantly more health and many demons are fire immune, charging Tiger Strike before unleashing Dragon Tail becomes the standard way to play. A few charged hits can drastically increase the final explosion damage, far surpassing the results of simply spamming Dragon Tail. While charging can sometimes feel tedious, the difference in damage output is absolutely worth it. As a simple rule of thumb:

If you follow this approach, you will have around 13 unassigned skill points at level 90. You can leave them unspent at first, experimenting with the build, and then investing them wherever they best enhance your natural playstyle.
Gear
As mentioned earlier, the physical damage from your kicks is converted into fire damage for the explosion, so maximizing physical damage is crucial for delivering powerful hits. If we can combine high physical damage with some negative modifiers to enemy fire resistance, we can truly skyrocket the potential of this build. Personally, I prefer a more aggressive approach, so my gear choices lean heavily toward offensive options.
 long with a Torch and an Anni. Fill the remaining grand charm slots with Martial Arts skillers and for small charms, prioritize whatever your character is lacking, ideally resistances. Even though your resistances will generally be solid, certain areas may still feel challenging. In those cases, simply swap , as your Spirit shield will provide more than enough safety to navigate through difficult zones comfortably.
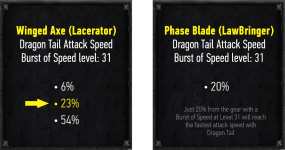
Regarding the Breakpoints, since the setup is focused on an aggressive playstyle, what we can really achieve is the attack speed. The rest breakpoints are either not crucial or are hand to maintain at high standards. So basically we want 26% Increased attack speed from the gear if we plan on using the Lacerator. Block is going to be low unless heavily points are invested in dexterity. Resistances are solid but not maxed and FCR is not needed at all.
Mercenary

As is often the case, the Mercenary plays more of a support role and in this build, he doesn’t have much else to offer other than buffing our Dragon Tail. An Act 2 Might Mercenary equipped with Infinity is a fantastic combination to further boost our Dragon Tail. The Might Aura increases our physical damage, directly enhancing the skill’s overall power, while Infinity’s Conviction Aura significantly boosts the fire damage from Dragon Tail. It's a great combination to improve our damage even more. The rest of the mercenary’s gear should focus on survivability, since all we need from him is to stay alive and provide his auras reliably.
What we’ve effectively achieved is stacking an outstanding amount of Physical Damage, which becomes doubled whenever Amplify Damage triggers and then further reinforced by the negative Enemy Fire Resistance we apply for the fire-explosion portion of Dragon Tail. With both elements amplified, the result is an exceptionally destructive combination.
On Players 1, the build performs smmotly. You don’t even need to charge Tiger Strike or rely on Amplify Damage. Simply spamming Dragon Tail is enough to wipe out any group of enemies instantly. The real challenge begins in Players 8, where monsters have significantly higher durability. To fully unleash the potential of this build, we must leverage both Tiger Strike and Amplify Damage. When engaging a pack, begin by attacking to build three Tiger Strike charges. During this process, Amplify Damage will almost certainly trigger, accomplishing both goals simultaneously. If enemies flee from the Lacerator proc, simply switch targets the important part is to land your Dragon Tail on the amplified target.
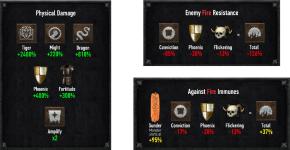
As long as the initial target is affected by Amplify Damage, the monsters behind it will receive the full fire-explosion damage, even if they themselves are not cursed. This is why the small area of effect on Amplify Damage isn’t a major drawback as you only need one amplified enemy to unleash the full power of the build. If anything survives, just keep attacking with Dragon Tail to unleash the rest two Charges.
Conclusion
Dragon Tail is a powerful skill that, with the right setup, can dominate virtually any area in the game. Its AoE damage is strong enough to clear most zones efficiently without wasting much time. It may take some time to get used to the gameplay and adapt to how the build functions, so a bit of practice is required. With experience, you’ll learn how to make the right decisions during combat and position yourself strategically to get the most out of your skill combination. While dual Mosaic Claws would allow constant Tiger Strike uptime for insane damage, relying on Mosaic essentially overshadows any other Assassin build. By avoiding Mosaic, we can still create a build that’s both creative and extremely powerful one that even a Mosaic-focused build might envy.
Bellona embodies controlled aggression the very spirit of this Dragon Tail Assassin.
Just like the Roman goddess herself, this character thrives in the heart of the fight. Every kick is a battlefield strike, every explosion of Dragon Tail mirrors Bellona’s unstoppable force, and every curse-enhanced hit unleashes a wave of destruction that turns entire packs into ash.
Positive
+ Massive Physical Damage
+ Massive Fire AOE Damage
+ Fast Move Speed
+ Crowd Control
+ Unique Build
Negative
- Tiger Strike Attack Rating
- Some Fire P8 Immunes
- Mediocre Defensively
Dragon Tail Mechanics
Before jumping into the build it's important to understand how the Skill works and what peculiarities are there about Kicks. Dragon Tail’s tooltip says it deals Fire Damage, which can be a bit misleading because in reality, it deals two types of damage: Physical Damage to the target you directly kick and Fire Damage to the enemies behind that target. Dragon Tail converts your physical damage into fire. The higher your physical damage the more fire damage Dragon Tail will deal. Therefore increasing your physical damage will tremendously benefit Dragon's Tails Fire damage. The confusion starts on how this damage is actually delivered. Even though the fire damage is based on your physical damage, it also depends on the physical damage the primary target receives. This leads to two important interactions:
- If the target is immune to physical, it takes no physical damage, which means the explosion carries no fire damage at all, the animation appears, but it deals zero damage.
- If the target is immune to fire, it will still take full physical damage, and the explosion will still damage enemies behind it, unless they are also fire immune.


Stats
When it comes to stats as usual assign enough points in Strength and Dexterity for the gear and the rest to vitality. Remember to account for the stats provided by your Torch and Anni before spending points. Also, equip your gear first to take advantage of any additional Strength or Dexterity bonuses it provides. Doing this will save you a good amount of stat points that can go straight to Vitality. Just a side note, for this build I would also like to mention the option of investing more points into Strength than usual. Since boots are your only source of flat damage for kicks, additional Strength can significantly increase that base damage. A few extra points here can translate into a noticeable boost to your overall Dragon Tail performance. This isn’t a route this guide is focused on, but it’s worth keeping in mind as a viable alternative depending on your gear and play-style.
- Strength: 167
- Dexterity: 112
- Vitality: Rest
- Energy: None
The core gameplay of this build revolves around spamming Dragon Tail, which thanks to the high physical damage provided by your gear will often be enough to one-shot regular enemies. In higher player settings, where monsters have significantly more health and many demons are fire immune, charging Tiger Strike before unleashing Dragon Tail becomes the standard way to play. A few charged hits can drastically increase the final explosion damage, far surpassing the results of simply spamming Dragon Tail. While charging can sometimes feel tedious, the difference in damage output is absolutely worth it. As a simple rule of thumb:
- If your unbuffed Dragon Tail already one-shots enemies → no need to charge.
- Against tougher mobs or bosses → fully charge Tiger Strike before delivering your kick for maximum impact

If you follow this approach, you will have around 13 unassigned skill points at level 90. You can leave them unspent at first, experimenting with the build, and then investing them wherever they best enhance your natural playstyle.
Gear
As mentioned earlier, the physical damage from your kicks is converted into fire damage for the explosion, so maximizing physical damage is crucial for delivering powerful hits. If we can combine high physical damage with some negative modifiers to enemy fire resistance, we can truly skyrocket the potential of this build. Personally, I prefer a more aggressive approach, so my gear choices lean heavily toward offensive options.
- Weapon: Lacerator
- Shield: Phoenix
- Armor: Fortitude
- Helm: Flickering Flame
- Gloves: Rare (2/20)
- Belt: Nosferatu's Coil
- Boots: Shadow Dancers
- Amulet: Mara's
- Rings: Raven + Rare (AR, LS, Resists)
- Switch: Cta + Spirit
- Inventory: Fire Sunder Charm, Skillers
- Lacerator has a 33% chance to cast on striking, which is an incredibly generous trigger rate for such a devastating curse. Very few items in the entire game offer such an easy and frequent way to apply Amplify Damage, making Lacerator uniquely valuable. That said, Lacerator comes with drawbacks. The curse affects a smaller area, and the weapon also causes monsters to flee. When that happens, Amplify Damage can immediately be overwritten, reducing its effectiveness and sometimes working directly against your goal of grouping enemies for Dragon Tail. You can’t go wrong with either option, both are excellent. But Amplify Damage is such an overwhelmingly strong curse for any build that relies on physical damage that, whenever you have an opportunity to incorporate it, you should strongly consider doing so.
- Phoenix Shield provides a massive up to 400% Increased Damage, which is perfect for boosting our kicks. On top of that, it also adds -28% to enemy fire resistance, further amplifying our skill’s damage. The synergy with this build is incredible, and the Phoenix Shield also offers additional perks, such as the Redemption aura, making it the best in slot item.
- Fortitude is another excellent choice. With 300% Enhanced Damage, it makes our kicks even more powerful. Beyond the offensive boost, Fortitude also provides solid resistances and a significant health bonus, making it a well-rounded and highly effective option.
- Flickering Flame seems like a no-brainer. With +3 to Fire Skills and up to minus 15 percent to enemy Fire Resistance, it significantly boosts the fire part of Dragon Tail. Additionally, even though I’m not usually a fan of Sunder Charms, the Resist Fire Aura on this helm practically forces you to use a Fire Sunder Charm, as it negates its fire penalty.
- In most builds, boots don’t offer anything truly game-changing, but for a Kicksin, they are the heart of the build. The primary requirement is boots with high base damage, and Myrmidon Greaves provide the highest possible damage, making them a non-negotiable pick. This leaves us with two choices: Gore Riders and Shadow Dancers. Gore Riders’ main advantage is the Crushing Blow, which this build otherwise lacks. However, because Crushing Blow and Open Wounds are primarily beneficial for Uber-oriented setups, my personal preference leans toward Shadow Dancers, which offer a more useful set of attributes. Ultimately, the choice between the two comes down to personal preference. If you decide to go with Gore Riders make sure to upgrade them.
- For gloves, we’re ideally looking for +2 to Martial Arts to boost our damage, along with 20% Increased Attack Speed to help us reach the desired attack breakpoint. Any additional mods such as life or mana steal, stats, or resistances are certainly welcome, though they can be difficult to find on the same pair of gloves.
- For the Belt Nosferatus Coil, is our only choice since we need that 10% Attack speed for our Dragon Tail to hit the next Breakpoint. Other than that, it's a solid belt with nice attributes.
- For rings, one slot is usually reserved for Raven Frost for the essential Cannot Be Frozen property, but the additional modifiers it provides are also very valuable. The other slot can be filled with a Bul-Kathos’ Wedding Band, which grants a skill point, life steal, and bonus life, all extremely useful for a Kicksin. Otherwise, a Rare ring with much needed AR and Resistances paired with some Life/Mana Steal is probably the better choice.
- For the Amulet a Mara's is great to boost our Dragon Tail more and of course the resistances which we really need.
- For weapon swap, the classic Call to Arms + Spirit combo is the go-to for Battle Orders and general survivability.
 long with a Torch and an Anni. Fill the remaining grand charm slots with Martial Arts skillers and for small charms, prioritize whatever your character is lacking, ideally resistances. Even though your resistances will generally be solid, certain areas may still feel challenging. In those cases, simply swap , as your Spirit shield will provide more than enough safety to navigate through difficult zones comfortably.
Regarding the Breakpoints, since the setup is focused on an aggressive playstyle, what we can really achieve is the attack speed. The rest breakpoints are either not crucial or are hand to maintain at high standards. So basically we want 26% Increased attack speed from the gear if we plan on using the Lacerator. Block is going to be low unless heavily points are invested in dexterity. Resistances are solid but not maxed and FCR is not needed at all.
- Faster Cast Rate: N/A
- Attack Speed: 30%
- Faster Hit Recovery: N/A
- Block Chance: N/A
- Resistances: Decent
Mercenary
As is often the case, the Mercenary plays more of a support role and in this build, he doesn’t have much else to offer other than buffing our Dragon Tail. An Act 2 Might Mercenary equipped with Infinity is a fantastic combination to further boost our Dragon Tail. The Might Aura increases our physical damage, directly enhancing the skill’s overall power, while Infinity’s Conviction Aura significantly boosts the fire damage from Dragon Tail. It's a great combination to improve our damage even more. The rest of the mercenary’s gear should focus on survivability, since all we need from him is to stay alive and provide his auras reliably.
- Weapon: Infinity
- Armor: Shaftop
- Helm: Vampires Gaze
What we’ve effectively achieved is stacking an outstanding amount of Physical Damage, which becomes doubled whenever Amplify Damage triggers and then further reinforced by the negative Enemy Fire Resistance we apply for the fire-explosion portion of Dragon Tail. With both elements amplified, the result is an exceptionally destructive combination.
On Players 1, the build performs smmotly. You don’t even need to charge Tiger Strike or rely on Amplify Damage. Simply spamming Dragon Tail is enough to wipe out any group of enemies instantly. The real challenge begins in Players 8, where monsters have significantly higher durability. To fully unleash the potential of this build, we must leverage both Tiger Strike and Amplify Damage. When engaging a pack, begin by attacking to build three Tiger Strike charges. During this process, Amplify Damage will almost certainly trigger, accomplishing both goals simultaneously. If enemies flee from the Lacerator proc, simply switch targets the important part is to land your Dragon Tail on the amplified target.

As long as the initial target is affected by Amplify Damage, the monsters behind it will receive the full fire-explosion damage, even if they themselves are not cursed. This is why the small area of effect on Amplify Damage isn’t a major drawback as you only need one amplified enemy to unleash the full power of the build. If anything survives, just keep attacking with Dragon Tail to unleash the rest two Charges.
Conclusion
Dragon Tail is a powerful skill that, with the right setup, can dominate virtually any area in the game. Its AoE damage is strong enough to clear most zones efficiently without wasting much time. It may take some time to get used to the gameplay and adapt to how the build functions, so a bit of practice is required. With experience, you’ll learn how to make the right decisions during combat and position yourself strategically to get the most out of your skill combination. While dual Mosaic Claws would allow constant Tiger Strike uptime for insane damage, relying on Mosaic essentially overshadows any other Assassin build. By avoiding Mosaic, we can still create a build that’s both creative and extremely powerful one that even a Mosaic-focused build might envy.
Last edited:

